Thinking about building your own LiFePO4 battery pack? You’re definitely not alone.
Across forums, YouTube, and social media, DIY enthusiasts are jumping into lithium iron phosphate projects—and for good reason. Whether you're looking to save money, build a custom power setup, or just satisfy your inner maker, putting together a LiFePO4 battery is a smart and satisfying challenge.
In this step-by-step guide, we’ll cover everything: choosing the right LiFePO4 cells, testing them, assembling your battery box, and wiring up a reliable BMS. Let’s get started!
A LiFePO4 battery pack is simply a collection of lithium iron phosphate cells (LiFePO4 stands for Lithium Iron Phosphate) connected in series, parallel, or both to create a rechargeable battery system.
These packs are popping up everywhere:
Off-grid solar systems
Electric bikes and scooters
DIY home energy storage
RVs and campers
Why LiFePO4? It’s safer, lasts longer, and is more stable than other lithium-ion chemistries—making it a great choice for beginners.
Here’s why so many people are going the DIY route:
Save Money
Pre-built LiFePO4 battery packs don’t come cheap. By sourcing your own components and assembling them yourself, you can often save 30–50%.
Customize to Fit Your Needs
Build exactly what you want—whether it’s a small pack for a camping lantern or a beefy 48V system for solar backup.
Learn and Grow
There’s no better way to understand batteries than building one yourself. Plus, you’ll earn some serious bragging rights.
Be Aware of the Risks
Let’s be real—DIY battery building has its dangers: short circuits, overheating, and poor cell balancing. But don’t worry, we’ll guide you through avoiding the common mistakes.
Here’s what you’ll need to get started:
LiFePO4 Cells
Type: Prismatic or cylindrical, 3.2V each
Quality Check: Aim for cells with less than 5% capacity difference and internal resistance under 1mΩ.
Pro Tip: Look for UL or CE certifications. Skip used or mismatched cells unless you’re sure about their cycle life.
Warning: Mixing cells with big capacity gaps (like 100Ah and 90Ah) will shorten your pack’s life.
Battery Management System (BMS)
A BMS protects your pack from overcharging, over-discharging, short circuits, and overheating.
Pick one that matches your setup (e.g., 4S 100A BMS for a 12V 100Ah system).
Smart BMS with Bluetooth monitoring is a nice bonus for convenience and safety.
Battery Box
You’ll need a sturdy enclosure:
Plastic: Lightweight, good for portable builds
Metal: Tough and heat-resistant
3D-Printed: Fully customizable (just make sure it’s strong and has ventilation)
Add ventilation holes, padding, and secure cell placement to avoid vibration and shorts.
Other Tools & Accessories
Multimeter – for voltage and resistance checks
Soldering iron or spot welder – for solid connections
Nickel strips – to connect cells
Heat shrink tubing – for insulation
Proper gauge wires – undersized wires = fire risk
Screwdriver & hardware – for terminals and case assembly
1. Plan Your Power Needs
Figure out your system:
Voltage = cells in series (e.g., 4 cells × 3.2V = 12.8V)
Capacity = cell capacity × parallel groups (e.g., 4 × 100Ah = 400Ah)
Sketch out a wiring plan based on your use—solar, camping, RV, etc.
2. Test Your LiFePO4 Cells
Don’t skip this step:
Capacity Test
Fully charge to 3.65V
Discharge to 2.5V with a tester
Check actual Ah against rated Ah (aim for 98–102Ah on a 100Ah cell)
Internal Resistance
Use an IR meter
Cells should be within 1mΩ of each other
Resting Voltage
After charging, cells should sit at ~3.2–3.3V
Any outliers? They’re likely weak or aged—replace them.
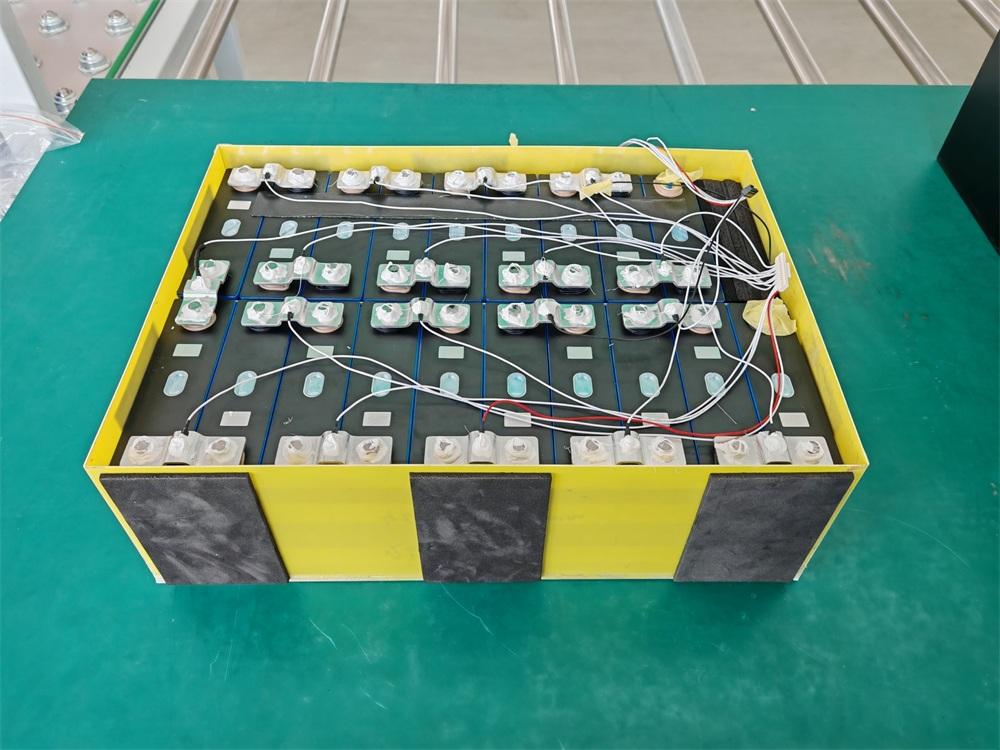
3. Connect the Batteries
Series Connection (Boosts Voltage)
Link + to – from cell to cell (e.g., 4S = 12.8V)
Parallel Connection (Boosts Capacity)
Connect all + together, all – together (e.g., 4P = 400Ah)
Use nickel strips and a spot welder for secure connections.
Double-check polarity before welding—reverse wiring can cause sparks or damage.
4. Install the BMS
Connect B- to battery negative, P- to load, and balance leads to each cell
Follow the wiring diagram closely
Test the cut-off functions:
Charge protection (14.6V max)
Low-voltage protection (usually ~2.5V per cell)
5. Assemble the Battery Box
Fit cells snugly
Add padding (foam or rubber)
Drill vents for airflow
Seal the case to keep moisture out
Inspect wiring before sealing it up
6. (Optional) Add an Inverter
Hook up positive and negative leads to BMS output
Test with a small load (like a 60W bulb)
Gradually increase load to avoid tripping the BMS
7. Final System Test
Check total pack voltage (e.g., 12.8V for 4S)
Charge fully and monitor temperature (keep it under 50°C)
Discharge under load and check voltage drop per cell
Make sure no cell lags—that signals a weak connection or bad cell
✅ Tighten all terminal connections
✅ Use a BMS rated above your expected current draw
✅ Keep battery in safe temperature range (0–45°C)
✅ Store in a fireproof spot
✅ Check voltages regularly and clean terminals
❌ Never mix battery chemistries (like NMC with LiFePO4)
DIY LiFePO4 battery projects are some of the most rewarding maker challenges out there. You’ll walk away with:
Hands-on technical skills
More energy independence
Real cost savings
A project you can truly be proud of
Test everything thoroughly, stick to safety practices, and enjoy the process of building something powerful from the ground up.
What Happens If I Skip the BMS?
Your cells risk overcharging, over-discharging, or even shorting out. A BMS is absolutely essential for safety.
Can I Expand My DIY Battery Later?
Yes, but you’ll need to closely match new cells in voltage and capacity and rebalance the whole pack. Otherwise, uneven stress will cut its life short.
Can I Mix LiFePO4 with Other Battery Types?
No—mixing LiFePO4 with NCM/NCA or others invites serious safety and performance problems. Stick to one chemistry.
Next:CATL Accelerates Sulfide Solid-State Battery Development Toward 2027 Pilot
Previous:Donut Lab Solid State Battery's Third Test Results Published, Proving It's No Supercapacitor